
All professionals involved with roofing projects (contractors, architects, homeowners, etc.) need to have an understanding of roof pitches. This information will allow them to determine how much material will be needed for a roofing project, the strength of the structure, and how effectively water can travel off the roof and away from the structure being built. This article will provide simple steps, professional techniques, and accepted methods in the industry to assist others in determining the pitch of their roofs with confidence and accuracy.
Table of Contents
What Is Roof Pitch and Why It Matters
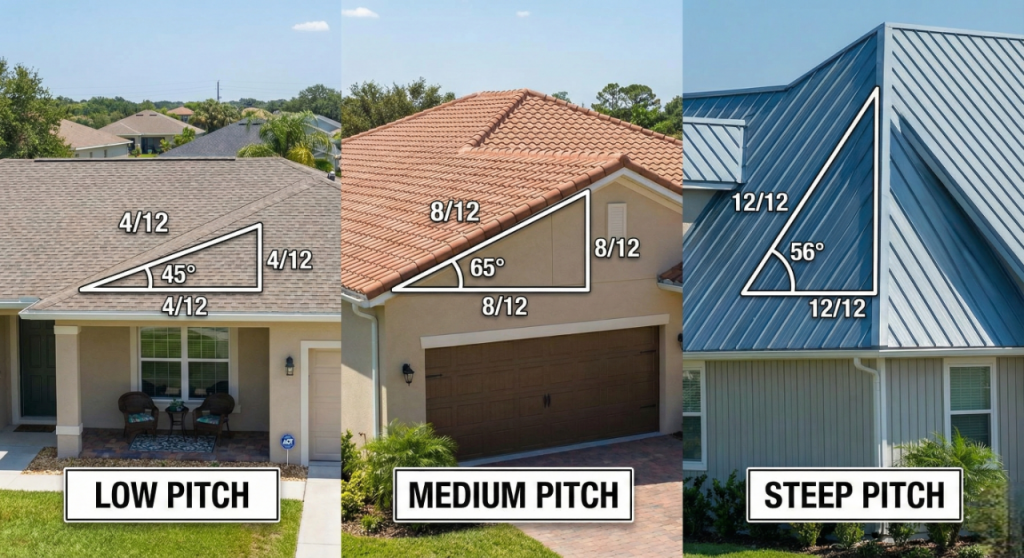
Roof pitch describes how steep or how flat a roof is. The measurement for pitch is based on a ratio of the number of inches that your roof rises vertically to the distance horizontally that it travels. Common examples of roof pitches in measuring the pitch of a roof are 4/12 or 6/12.
The slope of the roof, when measured correctly, will impact your roof’s:
- Load bearing
- Material/shingle compatibility
- Drainage performance
- Construction costs
- Labor requirements
- Safety planning
The Standard Roof Pitch Ratio Explained
Typically, a roof is pitched as a rise-over-run ratio where:
- A pitch 4/12 means that for every 12 inches of horizontal run, the roof will rise 4 inches.
- A pitch 12/12 indicates a roof with a 45-degree angle.
Using rise-over-run ratios for roof pitches makes comparisons between them easy, and also allows for consistent communication between roofing professionals.
Types of Roof Pitches You’ll Commonly Encounter
Flat Roofs (1/12 to 3/12)
Best for commercial and modern style buildings. These roofs use watertight materials such as TPO and/or EPDM, as they are used in flat-roofed buildings.
Slightly Sloped Roofs (4/12 to 7/12)
The majority of residential roofs are considered to have slight slopes. Roofs with a slight slope provide a balance between visual appeal, proper drainage, and ease of installation.
Very Steep Roofs (8/12 and above)
Aside from being aesthetically pleasing, steep roofs also provide excellent drainage and substantial attic space; however, because steep roofs require more experience to install, they generally require additional vertical safety precautions.
Tools Needed to Measure Roof Pitch Accurately
You will require various tools in order to appropriately and accurately depict the angles on your roof:
- Two-foot level
- Measuring tape
- Angle gauge
- Square (Speed Square)
- Ladder
- Electronic/ Digital angle finder
- Mobile Applications and/or software for mapping out your roof measurements or finding out how much is needed to complete a project
Having the right tools for measuring your roofs, increases safety, reduces stress, increases productivity, and therefore increases profitability.
How to Measure Roof Pitch From the Roof Surface
Step 1 – Position the level.
Lay a level-shaped object flat against the roof.
Step 2 – Measure the rise.
With a tape measure, take an upward vertical measurement from the lower end of the level, until you reach the roof surface. That measurement is called the rise.
Step 3- Note & Record the ratio.
- When using a 12″ level, your measurements will determine your roof’s pitch directly as a ratio of 1-to-X.
For example, an upward measurement of 3-inches on a 12-inch level equals a pitch ratio of 2-to-1. - When using a 24″ level, you divide your vertical measurement by 2. For example: a vertical measurement of 3-inches equals a pitch ratio of 3-to-1 | (1/2 pitch of 12″ level).
The average contractor and engineer typically perform a “multiple roof section” comparison of possible uniform pitch ratios throughout roofing systems.
How to Measure Roof Pitch From the Ground
If accessing the roof is unsafe, measuring roof pitches from the ground is a reliable alternative.
Use a Gable Measurement Technique
- From afar where you can see all of the gable edge.
- Use a mobile phone application or digital level that measures the angle.
- Now to determine the angle of the roof line.
- Now you can convert the angle that you recorded into inches of rise per foot of run or into a 3:12 slope using the above pitch conversion chart.
How to Measure Roof Pitch From Inside the Attic
Using the attic method for determining roof pitches does not require climbing to the roof Simply:
1) Hold a level horizontally against the bottom chord of the rafter;
2) Use that same level to mark a point 12 inches away from the other side of the rafter (bottom chord);
3) From the point (12 inches), measure upwards to where the rafter meets the ceiling (the underside of the rafter);
4) The measurement is the roof pitch.
Roof Pitch Conversion: Angle to Ratio
When working with roofing pitches, contractors frequently switch back and forth between angles and ratios.
- 18.4° = 4:12 Pitch
- 26.6° = 6:12 Pitch
- 33.7° = 8:12 Pitch
- 45° = 12:12 Pitch
Digital angle finders or apps provide an easier way to perform the conversion and limit the occurrence of human error.
How Roof Pitch Affects Material Selection
Choosing roofing materials based on roof pitches is vital for longevity and performance.
Low-Slope Roofs
Require waterproof membranes (TPO, PVC, EPDM).
Moderate-Slope Roofs
Compatible with asphalt shingles, metal panels, and tile.
Steep-Slope Roofs
Suitable for architectural shingles, slate, cedar shake, and standing seam metal.
Safety Tips When Measuring Roof Pitch
Working with roof pitches involves safety challenges. Follow these best practices:
- Make sure to use ladders and stabilizers that are able to support your weight.
- Avoid working in wet or windy conditions.
- Put on safety harnesses when working on steep roofs.
- Always maintain three points of contact.
- If you are working on a hazardous slope, make use of aerial measuring tools.
How Aerial Tools Simplify Roof Pitch Measurement
With high-resolution satellite imagery, aerial measurements can be taken for any pitch on any roof without needing to set foot on the roof itself. As a result, aerial measurement tools are a critical component of the modern roofing industry for key benefits such as speed and accuracy, as well as providing a professional level of documentation.
Common Mistakes When Measuring Roof Pitch
To avoid making mistakes when determining a roof pitch:
- Do not use a level that is not completely flat
- Do not measure from an uneven surface
- Do not misread your angle measurements
- Do not forget to check that the pitches of each section of the roof are consistent
- Do not ignore the differences in the structure of the attic
Final Thoughts on Accurate Roof Pitch Measurement
The ability to accurately measure roof pitches is critical for carrying out roofing jobs as safely and efficiently as possible while producing quality results and minimising costly mistakes. Whether you are an inspector, contractor, or homeowner, having a thorough understanding of roof pitch measurement will enable you to achieve the best results and reduce the number of expensive errors made during the construction process. By using the appropriate tools and adapting the proper technique for measuring roof pitch, all contractors can have confidence and accuracy when measuring roof pitches.
FAQs
1. Roof Pitch Definition
The Roof Pitch is the ratio of your roof’s vertical rise to horizontal run. Roof pitch is usually shown as 4/12 or 6/12.
2. Why Measure Your Roof Pitch?
Knowing the accurate pitch of your roof will help determine how much material you need for your roof (as well as how much drainage your roof requires, what safety items you will need, and how you will go about installing the roof.
3. Is it Possible to Measure Your Roof Pitch without Getting on Top of Your Roof?
You can measure a roof pitch by using a digital angle finder (or an app) that is installed on a mobile device. Additionally, you may also measure the gable from the ground and determine the pitch of the roof.
4. Items To Measure Roof Pitch Accurately
Some tools that may be used to measure a roof pitch accurately are a level, measuring tape, speed square, pitch gauge, and/or digital inclinometer.
5. What Roof Pitch Works Best for Residential Roofs?
The majority of the residential roof pitches are between 4/12 and 7/12 and are considered to be moderate, and allow for balanced aesthetics and drainage.